Day21 Geolocation

Demo(需打開定位)

今天要來練習取得經緯度
除了經緯度外,我們就試著把取得的資料全部印出來吧

詳細介紹,Navigator 介面標示了用戶代理(user agent)的狀態與身份。它允許腳本查詢與註冊,以進行一些活動。

白話解釋:翻譯為「導航」的意思,後面可以做一些事情
day19的取得相機也有用到

地理位置定位 geolocation

詳細介紹

getCurrentPosition() / watchPosition()

  1. getCurrentPosition():透過此方法可以取得目前位置。
    當成功取得位置後,會回傳一包含位置資訊的物件,並隨即執行特定的回呼常式。

    可能取得較低精確度的資料 (IP 位置或 WiFi) 而隨即開始作業。

  2. watchPosition():追蹤目前位置。
    此方法會持續追蹤在定位資料,當此資料改變時,會回傳一包含位置資訊的物件,並隨即執行特定的回呼常式。

    可能是裝置移動,或取得更精確的地理位置資訊

屬性

  • coords.latitude:緯度。
  • coords.longitude:經度。
  • coords.accuracy:精準度(getCurrentPosition精準度小於watchPosition)
  • coords.altitude:海拔高度(米)。
  • coords.altitudeAccuracy:海拔精準度。
  • coords.heading:前進方向的角度,以北方為0度順時針計算。
  • coords.speed:目前的速度(米/秒)。
  • timestamp:當下時間。

進入主題

1
2
3
4
5
6
7
8
9
10

function getPos() {
//getCurrentPosition
navigator.geolocation.watchPosition(function (data) {
console.log(data)
}, function (err) {
console.log('錯誤資訊:' + err)
})
}
getPos()

console.log看看

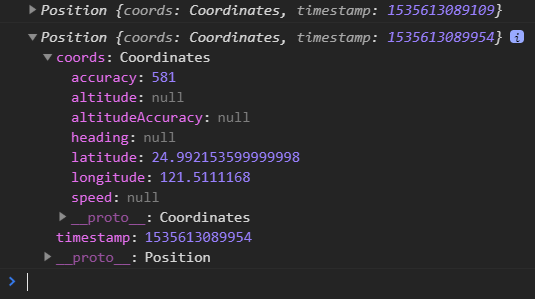
所以我們就可以將這些資料直接取出來顯示在畫面上了

1
2
3
4
5
6
7
8
9
10
11
12
13
14
15
16
17
18
19
20
21
22
23
24
25
26
27
28
const show_latitude = document.getElementById('latitude')
const show_longitude = document.getElementById('longitude')
const show_accuracy = document.getElementById('accuracy')
const show_altitude = document.getElementById('altitude')
const show_heading = document.getElementById('heading')
const show_speed = document.getElementById('speed')

function getPos() {
navigator.geolocation.watchPosition(function (data) {
console.log(data)
let latitude = data.coords.latitude;
let longitude = data.coords.longitude;
let accuracy = data.coords.accuracy;
let altitude = data.coords.altitude;
let heading = data.coords.heading;
let speed = data.coords.speed
show_latitude.textContent = longitude.toFixed(3)
show_longitude.textContent = latitude.toFixed(3)//取到後三位
show_accuracy.textContent = accuracy
show_altitude.textContent = altitude
show_heading.textContent = heading
show_speed.textContent = speed

}, function (err) {
console.log('錯誤資訊:' + err)
})
}
getPos()
0%